Part III: Construction
1. Choosing Finishes and Customizations
In most new-build apartment projects in Switzerland, buyers are given the opportunity to select certain interior finishes — such as flooring, kitchen, bathroom fittings, and sometimes lighting or wall colors. This is often one of the few moments during the construction process where the buyer is actively involved.
However, the process can be fast-moving and stressful, especially if you’re unfamiliar with what’s included, how upgrades are handled, or how to keep track of what you’ve agreed to. This section explains what to expect and how to navigate it smoothly.
1.1 How and When the Buyer Is Asked to Select Options
Once structural work is well underway (typically after the Rohbau / gros œuvre phase), the developer or their appointed interior coordinator will contact buyers to begin the selection process. This usually happens 6 to 12 months before handover.
You’re typically invited to a series of showroom visits, depending on which suppliers are used in your region:
- Parquet/flooring showroom (e.g. Swiss parquet supplier)
- Tile showroom (for bathroom/reduit and kitchen wall/floor tiles)
- Kitchen showroom (for layout, fronts, appliances, worktops)
- Sometimes a separate sanitary fittings showroom (taps, toilets, shower enclosures)
These showrooms are often in different locations, sometimes in another canton than the construction site. Plan ahead and allow time for several appointments over a few weeks.
At these appointments, you’ll:
- Choose materials and colors for each part of the apartment
- Review the standard options (within your contract allowance)
- Be shown upgrade choices, which carry surcharges
- Sign off on a selection protocol (Auswahlprotokoll / procès-verbal de choix)
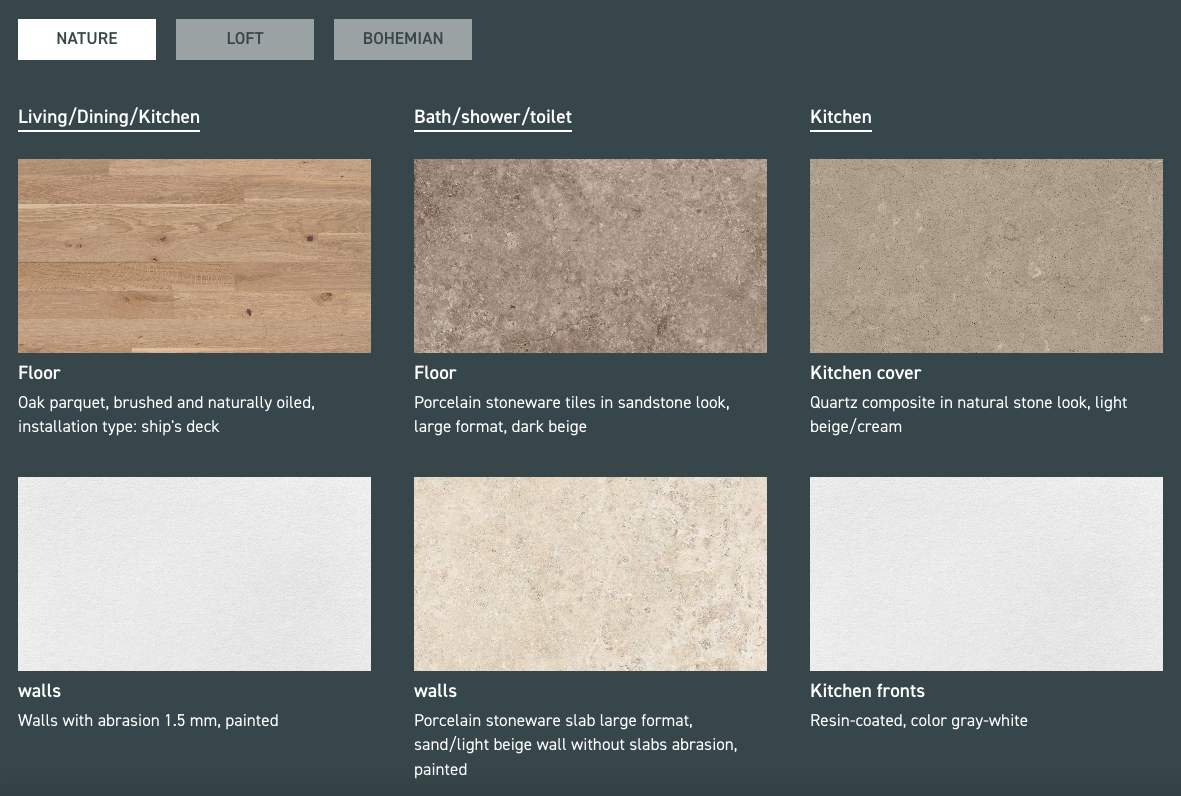
In some developments, the developer simplifies the process by offering pre-defined design lines (usually three), such as “Classic”, “Modern”, or “Urban Chic”. Each line includes coordinated choices for tiles, flooring, kitchen fronts, and sanitary fixtures. This helps reduce variation and installation errors — and makes your decision easier.
1.2 Typical Allowances vs. Upgrade Costs
Most developers define a base allowance (budget) per category. If your selection is more expensive, you’ll pay the difference out of pocket — usually via a separate invoice from the supplier or project manager.
Examples:
- A base allowance of CHF 15,000 for the kitchen
→ Upgrading to a CHF 20,000 layout = CHF 5,000 surcharge - Tiles included at CHF 90/m²
→ Choosing CHF 120/m² tiles = CHF 30/m² surcharge
The surcharges must be clearly documented, and you can usually request written quotes or cost breakdowns in advance.
1.3 Special Requests and Layout Changes
Beyond choosing materials, many buyers request minor customizations — but these are only possible if requested early enough, and will almost always come at a cost.
Common examples include:
- Asking for full-height wall tiling in the bathroom (rather than the standard half-height)
→ The builder will execute this and send an additional invoice. - Changing the position of electrical sockets, lights, or adding extra outlets
→ Must be requested before interior works begin and approved by the site electrician. - Swapping a shower for a bathtub, or vice versa
→ Possible in some cases, but may affect plumbing layout and pricing.
All changes will be coordinated through the developer or their appointed site manager. You typically will not work directly with the subcontractors.
Always confirm changes in writing and keep copies of every approval or upgrade order — especially when layout or electrical plans are involved.
In some projects, you may be allowed to request larger modifications (e.g. combining rooms, custom kitchen layouts), but only at the very early stage of construction, and with significant costs. These changes may also affect your PPE share or delay your handover date.
1.4 On-Site Confirmation Before Installation
Before the interior finishes are installed, buyers are typically invited for a site walkthrough with the relevant subcontractors (e.g. flooring or tile company). This usually happens just before tiles and parquet are laid.
During this visit, you’ll be asked to:
- Confirm the direction and pattern of the parquet (e.g. parallel to light source, diagonal, herringbone, etc.)
- Specify which tiles go where — for example, if you have selected different tiles for bathrooms/WCs.
- Confirm tile layout orientation and height (e.g. full or partial tiling in bathrooms)
This final check ensures that your intentions are understood before irreversible work begins.
1.5 How to Keep Records of What Was Agreed
Agreements made during showroom visits or via email can easily be lost, forgotten, or misinterpreted — especially when the project takes months to complete.
To avoid disputes:
- Take notes and photos of all selections — both standard and chosen upgrades
- Ask for a signed selection protocol after each visit (normally will be sent to you)
- Keep all cost quotes and confirmation emails as PDFs or printouts
- If a client portal is provided, double-check that your choices are correctly reflected
Photograph showroom labels or product brochures showing brand, model, and color codes — this is especially helpful for tiles, taps, and appliances.
1.6 Common Frustrations and Tips
- Fragmented process: You may have to visit 3-4 different showrooms, all managed by separate suppliers.
- Inflexible scheduling: Appointments are often limited, with strict cutoffs for decisions.
- Upgrade pressure: Not all “standard” choices are displayed attractively — making upgrades seem more appealing.
- Surprises at handover: Without good records, it’s hard to contest missing upgrades or mistaken installations.
Choose your finishes carefully: kitchen fronts and tiles are costly to change later, but appliances can often be replaced later at similar cost.
1.7 Practical Advice on Finishes
Parquet
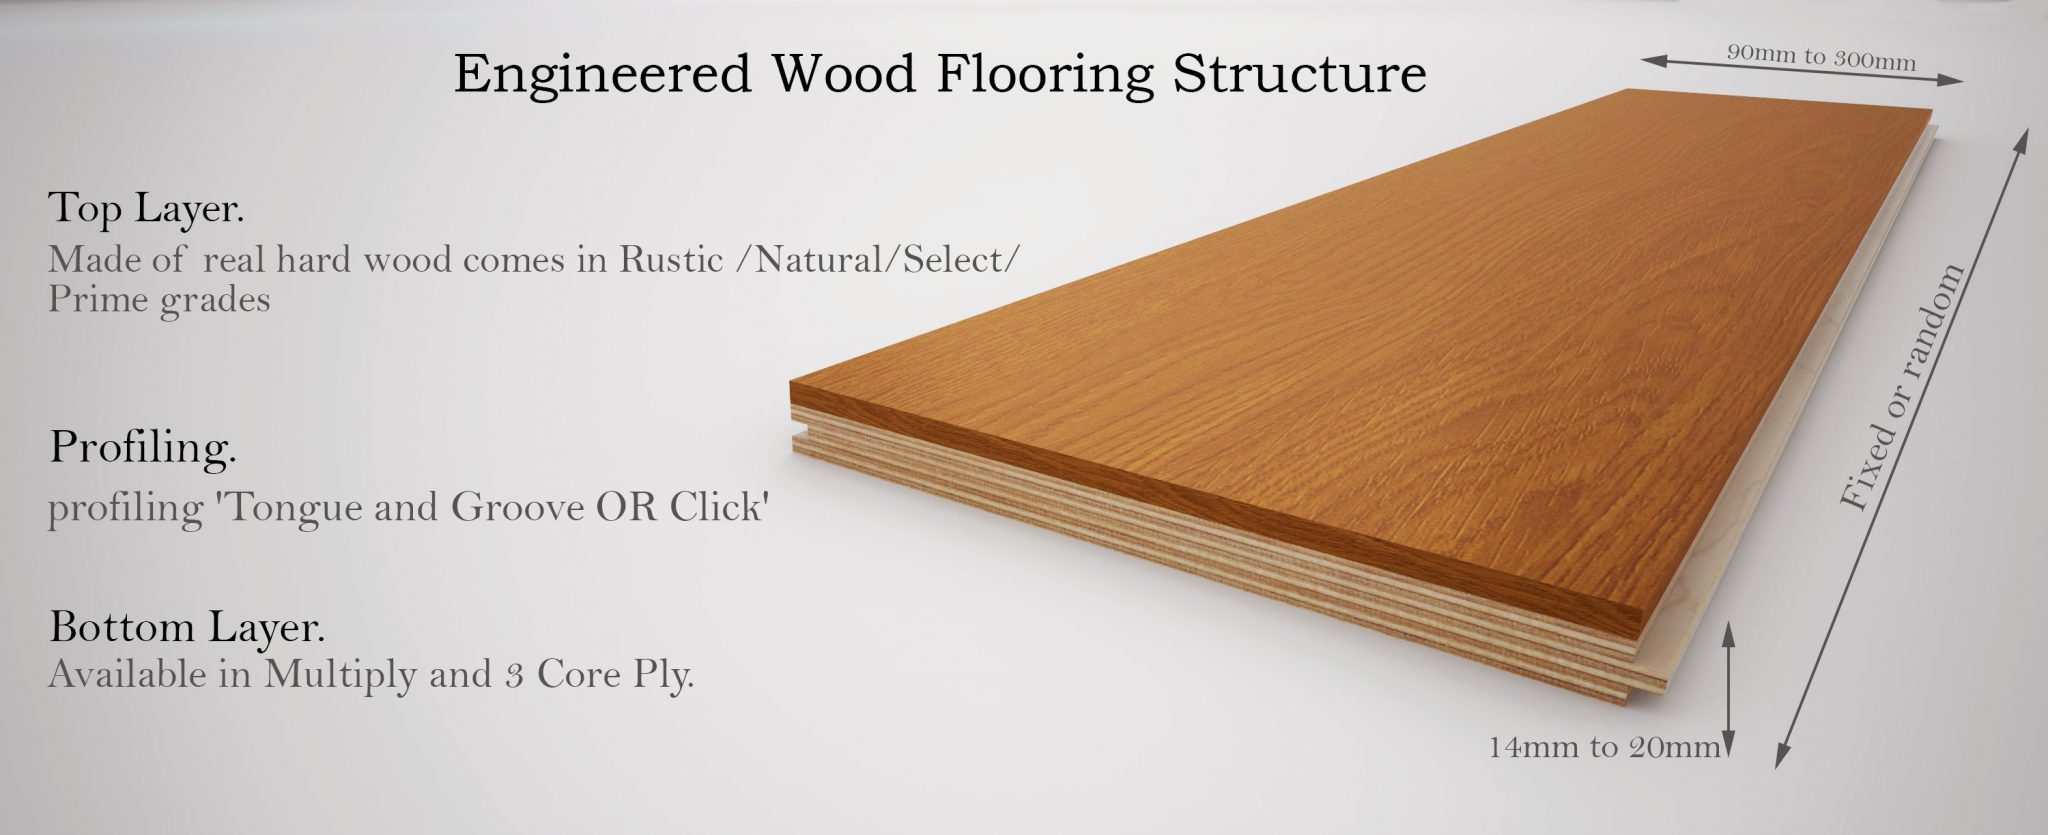
For most new apartments in Switzerland, the standard flooring offered is engineered parquet rather than solid wood. This is not a downgrade: engineered wood has a real hardwood top layer but is built on stable plywood or HDF backing. It performs better in modern buildings, especially where underfloor heating is installed, and is far less prone to warping.
-
Installation methods
- Floating (schwimmend verlegt): Cheaper and quicker. The boards click together and “float” over an underlay. Can sound slightly hollow and move under heavy furniture.
- Glue-down (Klebeparkett): More solid and quiet. Better for open-plan living rooms and kitchens. Requires perfect subfloor preparation because errors are permanent.
-
Surface finish
- Oiled: Natural look, warm to the touch, easier to repair scratches locally, but needs regular maintenance.
- Lacquered: More resistant to stains and easier to clean, but scratches are harder to fix invisibly.
-
Wood species
- Oak: By far the most common in Switzerland, durable and versatile.
- Walnut: Darker, elegant, but softer.
- Beech/Maple: Light tones, but more sensitive to humidity. Best avoided, since oak can be treated to achieve similar light colors with better durability.
Tiles
Unlike parquet, where the structural type has big implications, for tiles the differences are more about suitability for the space rather than quality.
-
Material types
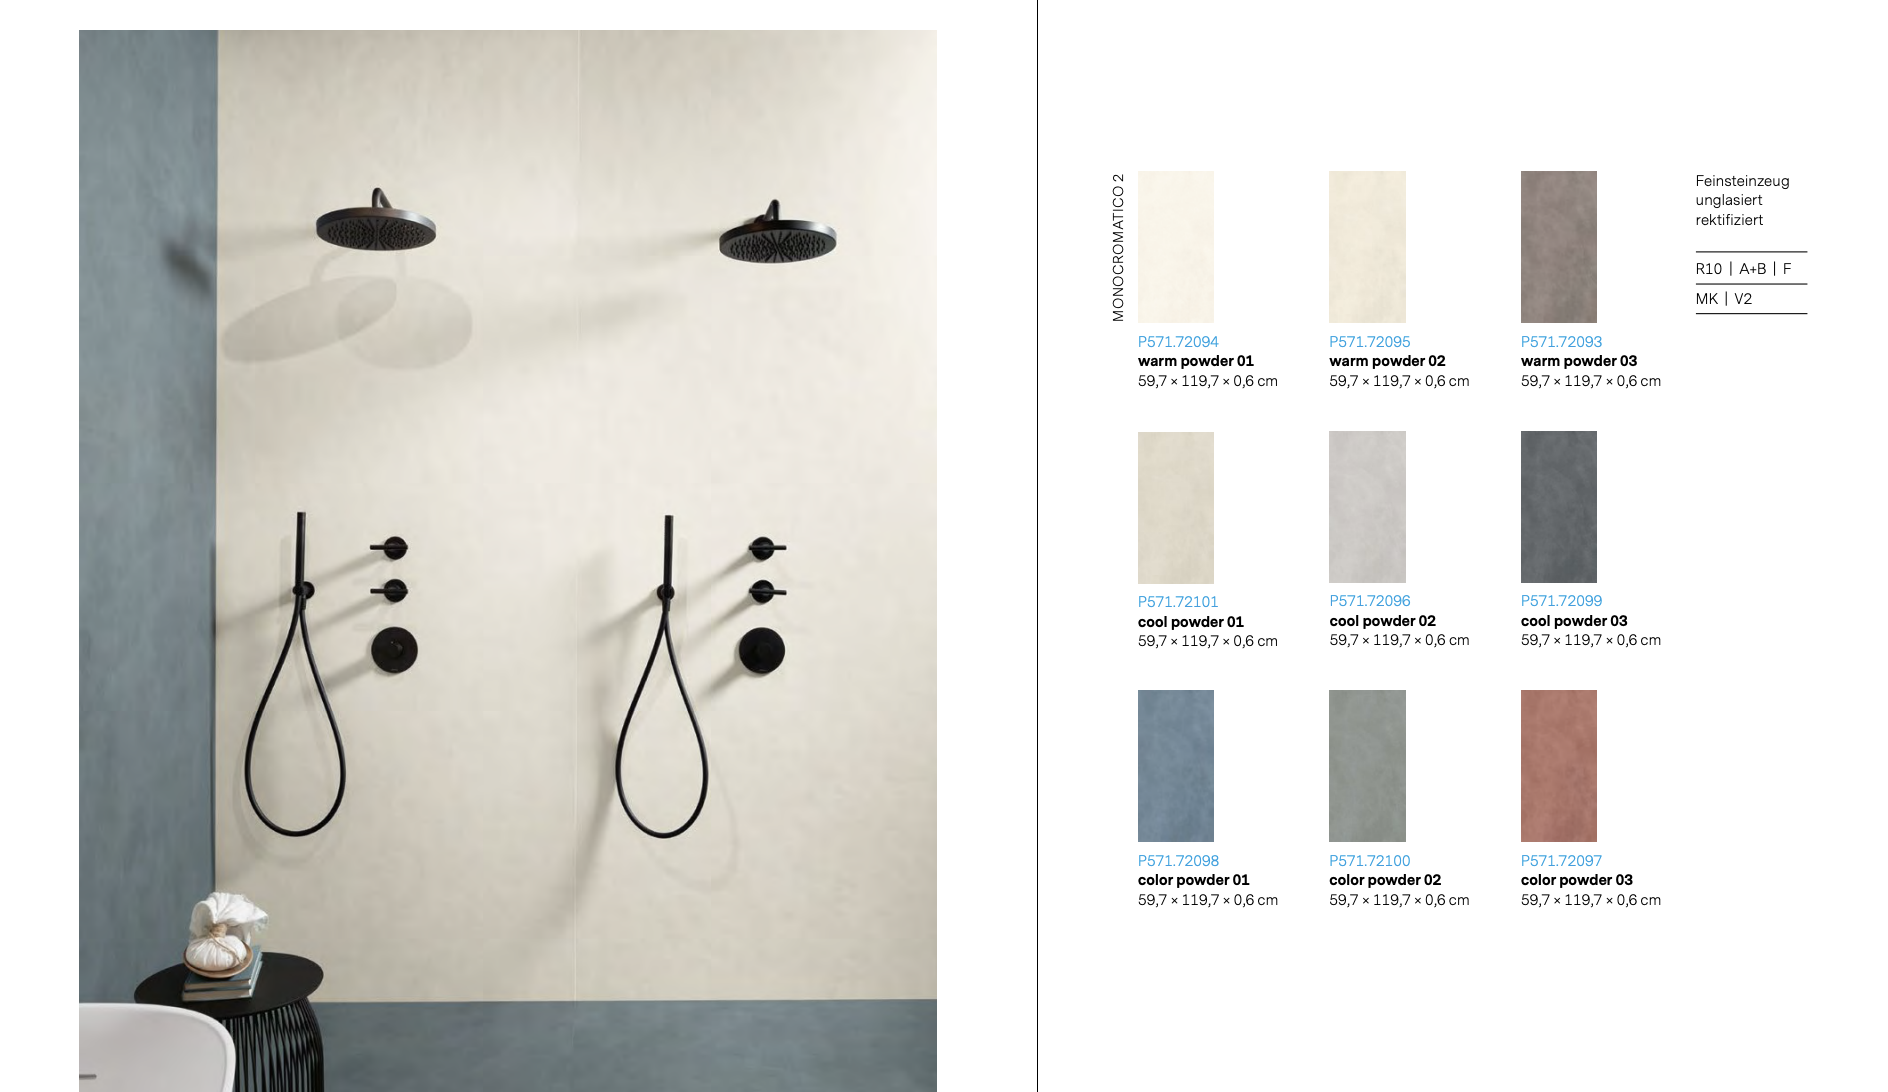
- Porcelain stoneware (Feinsteinzeug / grès cérame): The most common in Swiss new-builds. Dense, hard, and very low-porosity → ideal for bathrooms, kitchens, and outdoor spaces. Usually the safest choice.
- Ceramic tiles (Keramik / faïence): Cheaper, lighter, and easier to cut. Suitable for walls, but less durable on high-traffic floors.
- Natural stone (Granit, Marmor, Schiefer): Luxurious but expensive. Needs sealing and regular maintenance. Prone to staining and scratching if untreated.
- Cement tiles / terrazzo (Zementfliesen / terrazzo): Decorative and trendy, often in patterned or speckled designs. Higher maintenance — porous and must be sealed.
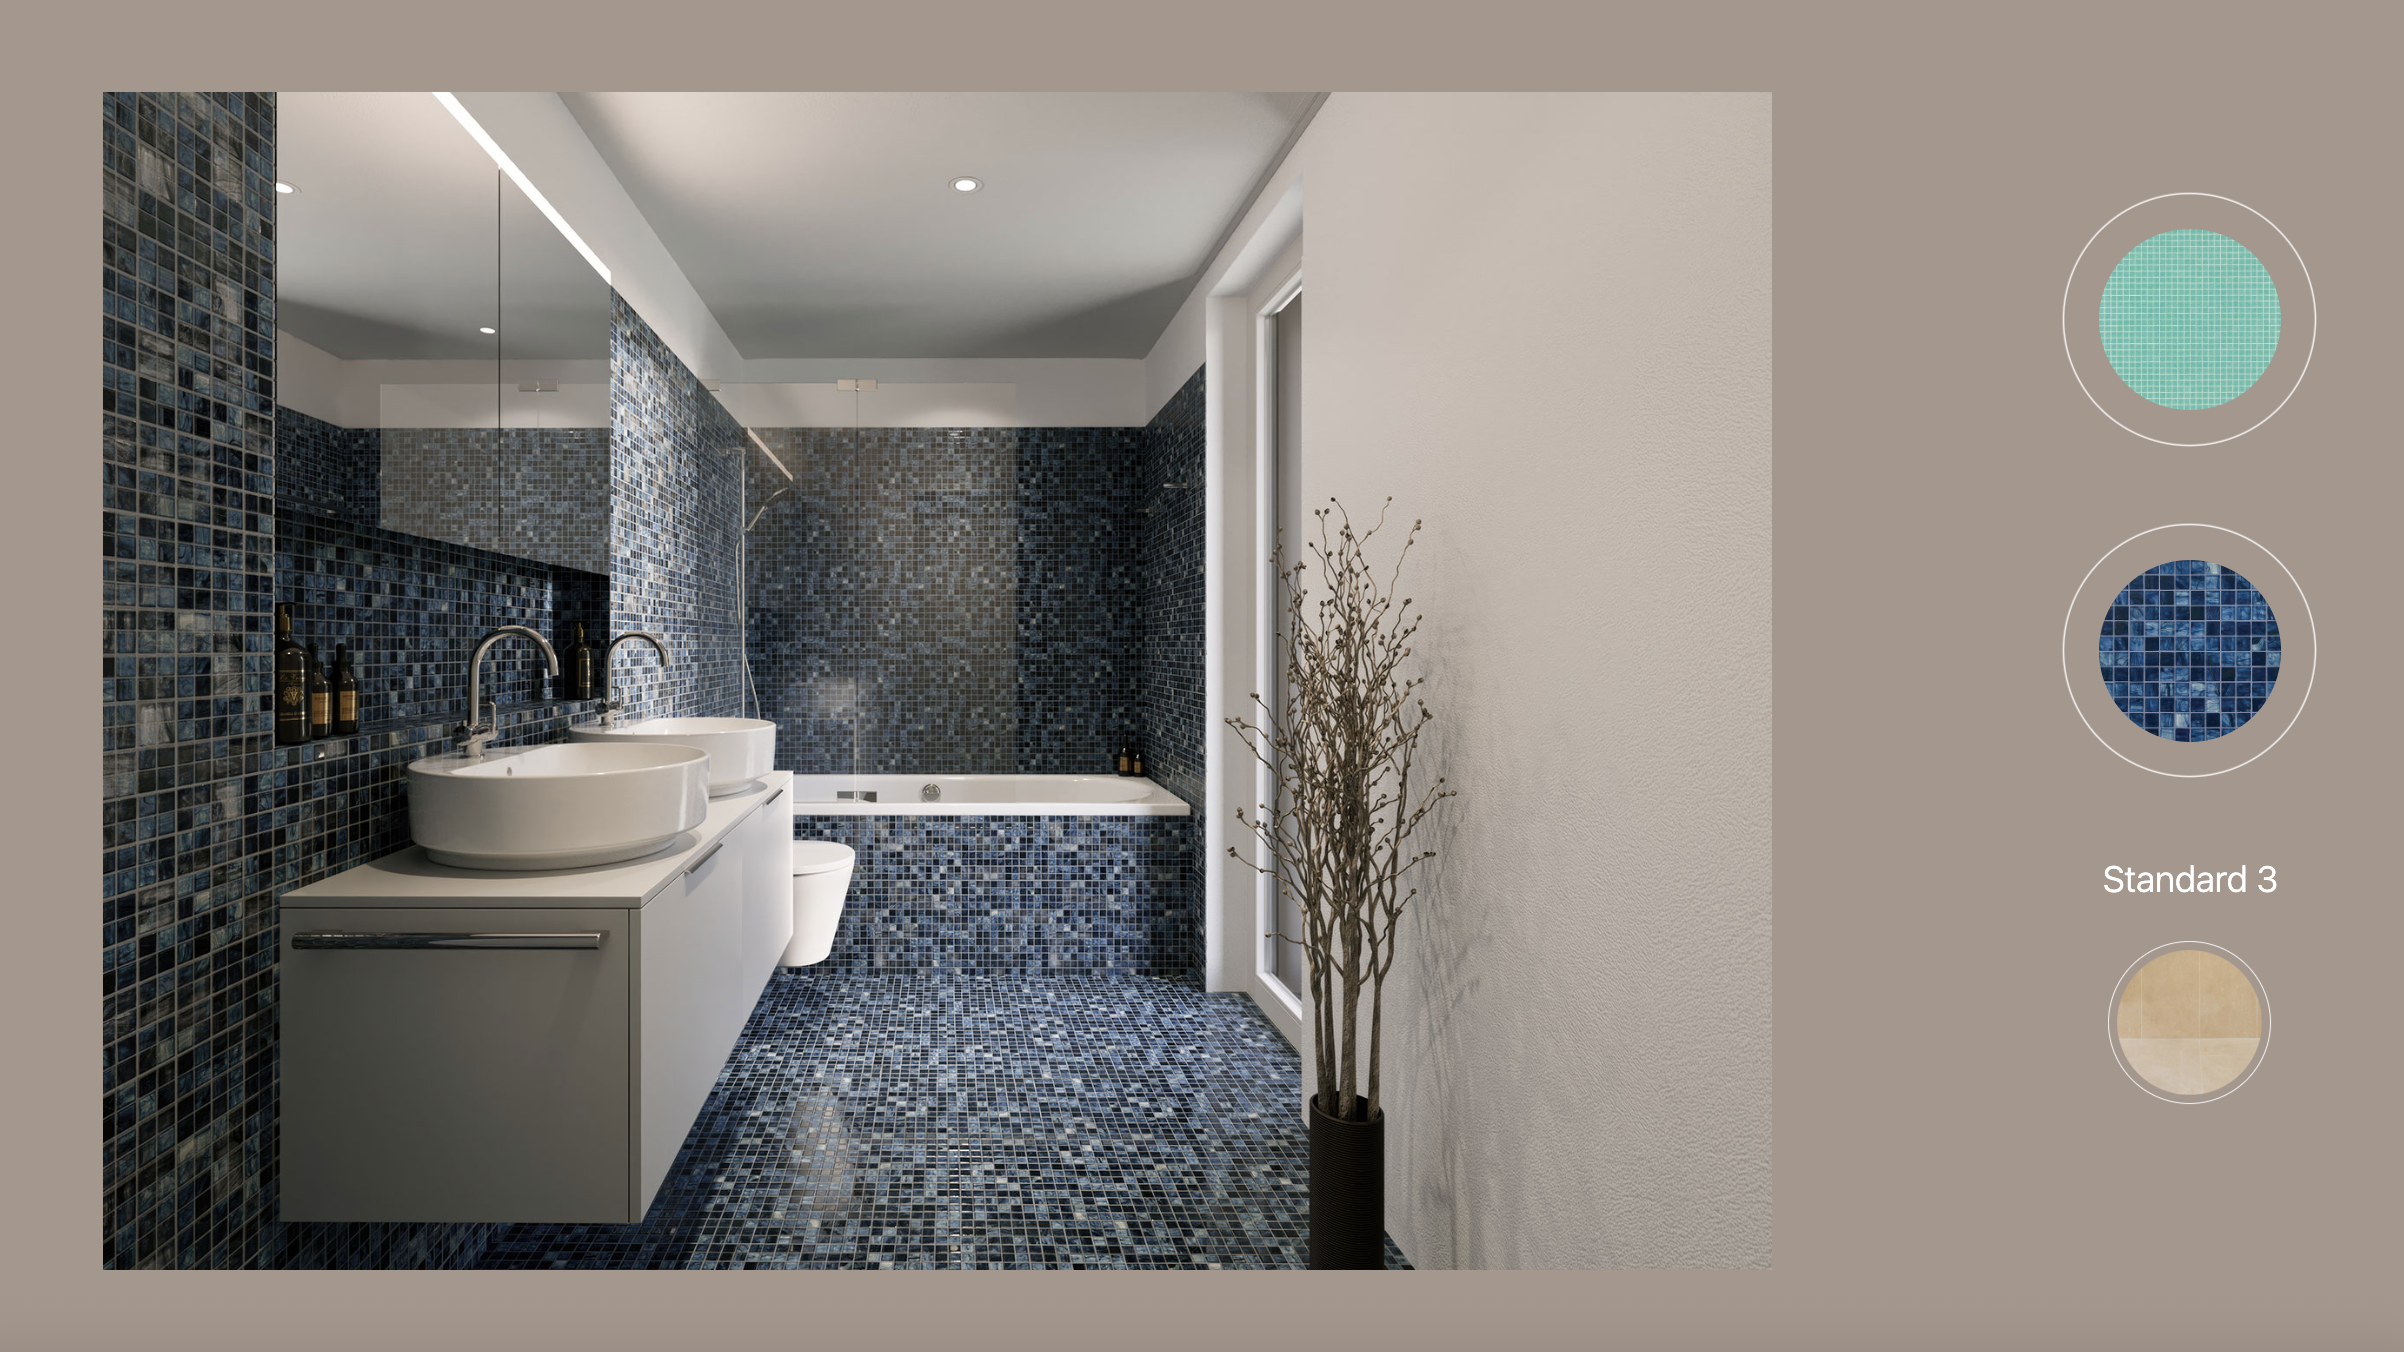
- Mosaic tiles (Mosaikfliesen / mosaïques): Very small tiles, often 2×2 cm or 5×5 cm, mounted on mesh sheets. Commonly used in bathrooms and shower floors because the many joints provide grip and allow slopes to drains.
-
Slip resistance
Tiles have an R-rating (DIN standard) from R9 (low) to R13 (very high).- Bathrooms: R10 is a good minimum.
- Outdoor terraces/balconies: at least R11 to handle wet conditions.
Slip resistance specifications for ceramic tiles from SABAG (in German)
-
Surface finish
- Matte tiles: Safer in bathrooms, hide dirt and water stains better.
- Glossy tiles: Sleek look but slippery and show every drop.
- Textured tiles: Good grip, but harder to clean.
-
Color & size
- Large-format tiles (60×60 cm or more) are fashionable but require a very flat subfloor to avoid uneven edges.
- Light colors brighten small rooms but show dirt easily.
- Dark colors look elegant but highlight dust, limescale, and scratches.
-
Maintenance
- Porcelain: Nearly maintenance-free.
- Natural stone: Needs sealing every few years.
- Rough finishes: Collect dirt and can be hard to scrub.
For long-term durability, choose porcelain with a matte finish for bathrooms and kitchens.
Glossy tiles or natural stone can look stunning, but they require more upkeep and may be slippery.
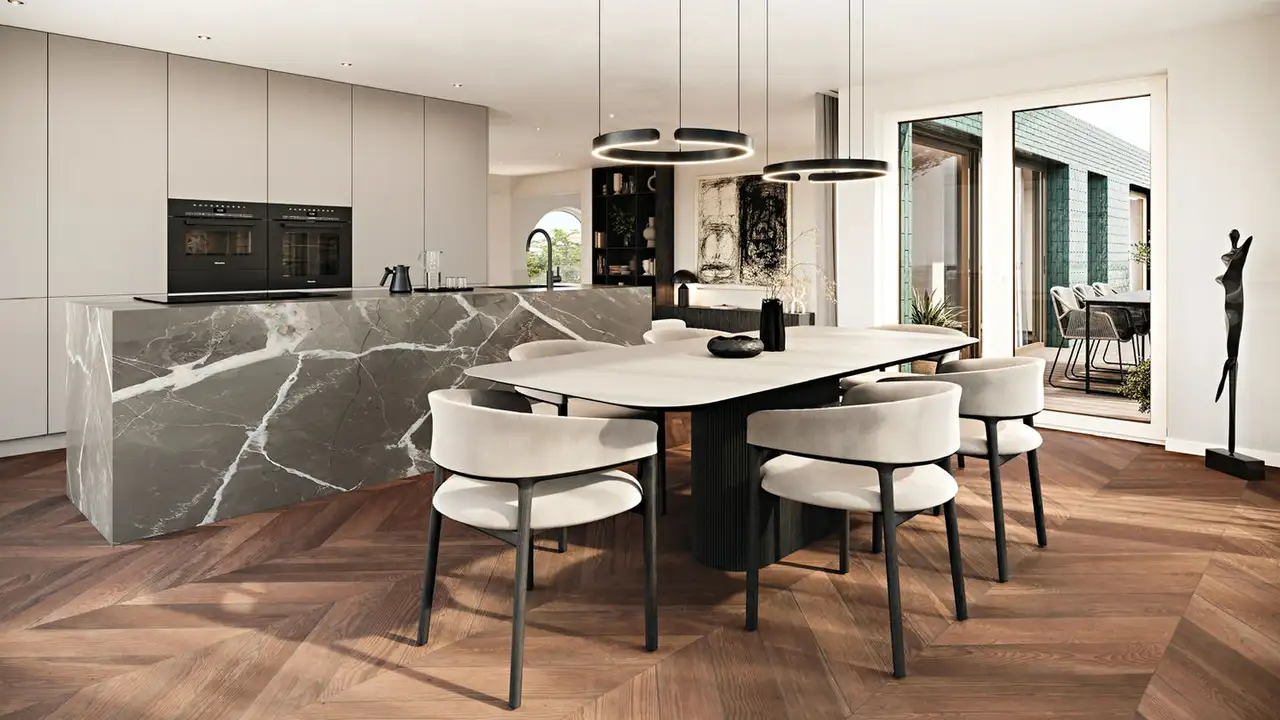
Kitchen
The kitchen is one of the most costly and visible parts of a new apartment, and also the area with the most upgrade pressure. Standard allowances often cover only basic materials, so knowing what matters can help you avoid expensive surprises.
-
Worktops (Arbeitsplatten / plans de travail)
- Artificial stone / quartz composite (e.g. Silestone, Caesarstone): Default option in new-builds. Durable, heat- and scratch-resistant, many colors. A strong mid-range choice.
- Natural stone (Granite, Marble): Elegant and unique patterns. Granite is durable; marble looks luxurious but stains and scratches easily, better avoided if kitchen to be used extensively.
- Ceramic / Dekton: Extremely hard, heat-proof, non-porous, and scratch-resistant. Premium option, often beyond standard allowance.
- Stainless steel (Edelstahl / acier inox): Used in professional and premium kitchens. Hygienic, heat-proof, and durable.
- Steel cover: A thin stainless sheet laminated over a substrate (lighter, more common).
- Solid steel panel: A full-thickness stainless slab. Very heavy, extremely costly, but virtually indestructible.
- Solid wood: Warm look, but sensitive to water and scratches. Needs regular oiling. Rare in standard new builds.
-
Fronts (Küchenfronten / façades de cuisine)
- Laminate (Melaminharz): Most common standard option. Affordable, robust, easy to clean, but edges can wear.
- Lacquered (lackiert / laqué): Smooth, modern look, available in gloss or matte. Shows fingerprints more easily.
- Veneer (Furnier / placage bois): Thin real-wood layer over a stable base. Natural look at lower cost than solid wood.
- Solid wood: Rare in new builds, premium option, requires care.
- Glass / high-gloss acrylic: Sleek, design-driven, but scratches show quickly.
- Metallic / stainless fronts: Premium design statement, often combined with stainless worktops for a professional look. Fingerprints can be an issue unless brushed or coated.
-
Handles vs. handle-less (Griff vs. grifflos)
Handle-less kitchens with integrated grip rails look modern but are less ergonomic. Fingerprints and wear are more visible, especially on dark matte finishes. -
Durability & maintenance
- For worktops: quartz composite, ceramic, or stainless steel offer the best durability with low maintenance.
- For fronts: laminate or matte lacquer are practical; veneers add warmth but require more care.
Waterfall Islands
A waterfall island is a kitchen island where the worktop material continues seamlessly down the sides, creating a sculptural, block-like look. The effect is achieved by mitre-joining large-format slabs (stone, ceramic, or stainless steel) at 45°, aligning the veins or patterns so they “flow” from the top to the side.
- Best materials: quartz composite, Dekton, or natural stone (with visible veins).
- Benefits: visually striking centerpiece, durable, protects cabinetry sides from water and cleaning wear.
- Considerations: costly fabrication; mitred ceramic edges are delicate and must be handled carefully during transport.
This design has become very popular in premium developments, especially for open-plan living where the kitchen is meant to look like part of the living space.
Concealed Kitchens
High-end apartments increasingly feature concealed kitchen walls — tall, seamless fronts that hide appliances
and shelves behind sliding or pocket doors.
When closed, the wall looks like minimalist cabinetry; when opened, it reveals a full kitchen workspace.
-
Common setups include:
- Retractable or folding doors that slide into side pockets
- Hidden storage for coffee machines, mixers, or dishware
- Integrated lighting and plug sockets behind the doors
-
Advantages:
- Keeps the living area visually clean and quiet
- Ideal for open-plan layouts and compact apartments
If you have a limited upgrade budget, invest in a high-quality worktop first — it’s exposed to water, heat, and daily wear. Kitchen fronts can be swapped later, but replacing a worktop is costly and disruptive.